Sunday, October 31, 2010

The Blog Candy I Won from Suzanne Dean/Scrapbitz!


I won these two adorable clear Magnolia stamps and the MS cobweb punch (and a lovely Cosmo Cricket printed paper pad!) by commenting on a blog post over at Scrapbitz.  The blog post asked to comment what your favorite costume was and I posted about my home made voodoo doll costume (I blogged about here to, see "Just a little voodoo").  Suzanne chose my comment!!  I was so excited!   So finally, I have been able to play with all my new stuff and I made these two cards.

I took Suzanne's beginners Copic classes (I'm taking the advanced ones too) and I just love her and her classes!  You know, copics are quite an investment and one that doesn't come with any guidance.  Suzanne gives such useful and money-saving tips and advice -- everything is covered; what to invest in, what isn't needed, how to refill the markers, what color combos work together and which ones don't -- AND all the while, she is demonstrating her techniques and teaching you how to use Copics!!  She's amazing and the classes are priceless.  She also has taken her classes on the road so if you are the type of person who learns better in a classroom situation, she's got you covered!  Here is the link, "Color Me Creative Classroom" if you would like to check it out.

Ghostly Gossmere

This is another Tiddly Inks digital stamp, Gossmere.  I really enjoyed the "black out" challenge from  A Day For Daisies and thought it would be fun to try it again using another stamp.  So this was the result.  I used an A7 Bazzill card, the printed paper is from Martha Stewart (vampire paper pad), and the embossed graveyard was made using a Quickutz embossing folder and added the fence (MS punch).  I made the flowers and gave each a glittery black center (Doodlebug brads).  Gossmere's face, hair, and arms were colored with copics but her dress was printed several times - once on Gina K Luxury cardstock and three times on heavy weight vellum.  I made a mixture of Glossy Accents and Pearl Ex (#651 Pearl White) and then I painted it; I wanted it to look like a tattered gown.  I added a cream colored ribbon to the waistline.  After everything dried, I then layered up the dress, cutting and scrunching the edges of the dress.  It gave it wonderful dimension!  I thought she looked pretty ghostly :)  I stamped the sentiment, embossed it, and cut it out using SB nesties (Labels 9). 

It was a lot of fun using the rules for the ADFD challenge (which, by the way, is still going on!! November 4 is the last day for the challenge so please give it a try!).

Gone Batty!

I just love Tiddly Inks digital stamps - they are so stinkin' cute!  This little doll is called, Batty.  She's colored with copics and her buttons and hair clip are tiny rhinestones (Recollections).  I cut out her bat balloon, covered it in UTEE and then glittered it with chunky black glitter.  The card is a pre-cut DCWV card.  The sentiment is a rub-on from a $1 pack from AC Moore.

Vintage Halloween

This little beauty comes from Third Coast Art Rubber Stamps.  Her name is Kitty & Cat (find her here).  She's colored with copics and embellished with lavender Stickles.  Her pumpkin was colored then coated with Glossy Accents.  I mounted the image on Bazzill Bling cardstock (Spoiled Brat) and cut with SB oval nesties; I used lavendar (not sure of the actual color name) Bazzill Bling cardstock cut with SB scalloped oval nestie.  The crepe paper embellishment was actually white party streamers I had around the house.  I colored it with my Bic Mark Its and then accordian-folded it and then, using double-sided tape, affixed it to the back of the oval.  The "Oct. 31st" is a sticker from a $1 pack from AC Moore and I attached the black and orange ribbon.  Finally, I embossed a square of the Bazzill cardstock (same used for the oval) with a Quickutz embossing folder and affixed everything to a Bazzill A2 card!

Hildegard

 In my quest to find a scary witch for my sister's card, I came across Hildegard here at Third Coast Art Rubber Stamps.  She looks scary enough...until I read the sentiment that came with her!  So Mom I thought you would get a kick out of ol' Hildy :)

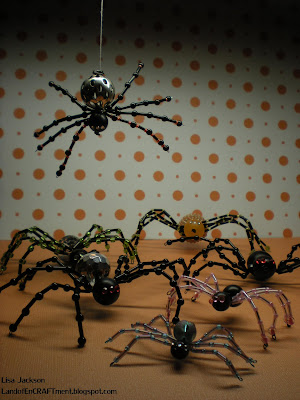
Arachnophobia!

Happy Halloween Everyone! 

I don't like spiders.  I can handle mice and snakes - well not if they were in my house - but I don't like to see even pictures of creepy crawly spiders!  So it's funny to me that I would enjoy making these little beaded beauties!  I found instructions for them in the Better Homes & Gardens Special Publication Halloween 2010.  They were pretty easy and I had a lot of fun choosing different beads for their bodies and legs.  I put my own twist on them by varying the sizes and the bead combinations, along with putting the rhinestones eyes on each!    
They are going to hang in my doorway tonight to surprise unexpected Trick-or-Treaters.  Hmmmm, maybe that's how my phobia of spiders started!?   

Saturday, October 30, 2010

Hellish High Heels

I am not sure I've posted more than one post in a day before but I'm a few posts behind and Halloween is 4 short hours away!  It's been such a busy month - I can't believe it's over tomorrow :( 

I couldn't resist making a pair of paper Halloween high heels using the template by Carlos N. Molina.  I made a couple modifications by making it a closed-toe shoe and the addition of the spider web strap.  Once I saw the cobweb on the October 31st Cricut cartridge, I knew I wanted it on my shoes; the same with the spider embellishments (brads by Creative Imaginations).  I sure wish I could get these in a Women's size 7 :)

A Wicked Witch for Shelly

My sister has been asking me to make a card with a scary witch instead of the cards I've been making with the cutie witches.  I didn't think I could find a scary witch...and then I stumbled upon the Etsy shop of Rick St. Dennis.  The image is called, "THAT-A-WAY Witch" and I knew the moment I saw her, this was Shell's witch!  There are some really wonderful images at Rick's Etsy shop (I bought the SeaSprites also!) and I am in *love* with this witch!  She's colored with copics and embellished here and there with glaze pens.  The potion bottles got a thick coat of glossy accents after I colored their contents with glaze markers.  The image is cut out with SB Nestabilities big scalloped squares (large).  I colored the background with a C3 copic marker and edged the picture with gun metal Stickles. The metal brads are by Creative Imaginations (the style is Fright Night #21787) and the sentiment is from a $1 pack of Halloween stickers from AC Moore.  The card is Bazzill cardstock and the gorgeous flocked damask background (cut with SB mega nestie curved rectangles) is The Paper Studio (brocade flocked - black, item #982033). (I don't have any info for the orange striped paper.) 

So there you have it Shell; I hope you like her as much as I do.  I had a good time coloring her up.  She reminded me of the one Halloween when you came to visit and we dressed like witches :)  Sure wish you were here THIS Halloween!  Love you <3 

Tuesday, October 26, 2010

Front Porch Decorations

I was perusing my copy of  the Better Homes and Gardens special interest publication HALLOWEEN 2010 magazine and came across a 4-page spread of really neat Halloween displays by Debbie Dusenberg (I found her blog!!! Curious Sofa Diaries). One of the displays she created for Halloween uses a pair of bendable mannequin legs, clad in orange and black striped tights with witch shoes, and planted in an urn.  It looked so freaky and cool;  I knew I had the decoration for my front porch!  As it turns out, bendable mannequin legs are unbelievably expensive so I had to go with the more realistic price and little
less realistic-looking legs.  So, I went with inflatable legs ($15/pr), tights (child size - $2.50/pr), witch shoe covers ($5/pr and I had one pair) over black socks, and the "dress" is a  black trash bag.  I had the witch hats but they were from the Target $1 bins.  I added the polka dot ribbon (Hobby Lobby -40% off).  My door sign came from WalMart ($10) but it was a must - those polka dots!  And the hanger - so stinkin' cute!  I will add our carved pumpkins to the porch and a life-size talking witch for the bay window on Halloween night.  I am going to fill "BOo" bags now and watch the Rocky Horror GLEE episode - it just doesn't get any better than this :)  Have I mentioned I love Halloween?  ;)

Monday, October 25, 2010

Feline Playful! and 500 Followers Blog Candy!

I just wanted to tell you all about a great and super handy blog site that provides links to many of the challenge blogs out there for crafters and it also provides information about some of the challenges -- it's wonderful!    Right now, Feline Playful is offering some incredible blog candy to celebrate 500 followers!  Check it out here for details on how to win.  A random winner will be chosen on November 6, 2010!!

Have a great week!
<3 Lisa

Thursday, October 21, 2010

A Day for Daisies - Breast Cancer Awareness *FREE* Digital Stamps!

Tammy Thompson, A Day for Daisies, has designed three lovely breast cancer awareness digital stamps and she is offering them for FREE!  You can get them at the A Day For Daisies website under "freebies"  or over at the Crafter's Digital Art Center here:  A Day For Daisies !  I used "Pink Ribbon Tree One" for my card.  Be sure to grab these wonderful digis!

Tuesday, October 19, 2010

I Date Zombies... (NOT for the faint at heart!)

--WE INTERRUPT THIS BLOG TO BRING YOU A SPECIAL BULLETIN - The Walking Dead have invaded Land Of  EnCRAFTment!

The inspiration for this card comes from a card featured at Squigglefly.com.  It was designed by Marlene/ Disguised as a Grownup blog -- see the card here:  Disguised as a Grownup.

I used the same sentiment but chose the  image "Here's to You" from Squigglefly.com and added a digi zombie --  a **FREE** digi zombie -- from Make it Crafty (Yes - I said FREE! It's called "Halloween Zombie and you can get it here!)  Both images were colored with copics. I glitzed up the gal with Lilac Stickles and small rhinestones for her bling.  I used lots of  red Glaze (pen) and glossy accents on my zombie so he would look all slimy and oozy. (George Romero would be so proud - *snicker*!).  I used Bazzill cardstock (card) and DCWV colored cardstock (accent green).
***

So, yeah,  this is a little outside the box for me!  I love scary and spooky but I have never been into gore; let alone crafty card-gore *but* clearly, I couldn't NOT make this card (and it was really fun!)  Don't worry; I was only dabbling... Regular scheduled blogging will resume shortly...  ';) Lisa

Friday, October 15, 2010

A Day For Daisies Flower Basket Challenge#4

Happy Friday Everyone! The next challenge at the A Day For Daisies Flower Basket begins today and the theme is "Black Out!" The challenge is to use as many black elements as possible --black paper, black glitter, black rhinestones -- whatever creative elements you can come up with as long as they are black!

I have to admit, I was afraid this one was going to be a bit tricky because when I look at the happy and cheerful images Tammy creates, the color
black doesn't really come to mind! *BUT* when I saw Tammy's darling digi called "Ghost Ride," then I knew exactly what "black out" element I would incorporate into my project... the dark of night!

That's right, my challenge inspiration is a luminary! I used a Febreze Flameless Luminary base and created my own shade using Bazzill cardstock and vellum. Here are the other elements I used: grosgrain ribbon, metal tag, brad... oh and the cardstock I chose is also embossed with a black damask pattern!

This was so much fun and I would love to see what you all can do with this challenge! Please be sure to check out the new! and improved! Flower Basket challenge blog and come play along!

Thursday, October 7, 2010

A Day For Daisies Challenge at CDAC!

A Day For Daisies is hosting a challenge over at the Crafter's Digital Art Center. Please check it out here and come play along!

I used DCWV Midnight Spell Cardstock stack along with A Day For Daisies image, "Fall Fun." I colored the image with a mix of Prismacolor pencil (blended with Gamsol) and copic markers. The image was printed on Gina K Luxury cardstock and on cloud printed paper. I cut out the little girls and adhered them to the printed paper. The sentiment was printed using my Xyron design runner.

Wednesday, October 6, 2010

A Little Halloween Fun

So, I *love* Halloween. I've pondered this here before so I won't bore you with such musings again. But I can't help but to share some Halloween cards I made with some super-cute digital stamps!

This cutie glam witch is a digital image by The Pixie Cottage, called "South End Witch". I colored her face, arms & hair with copics (her lips - pink Souffle pen [it worked like collagen-ha!]) and then paper-pieced her clothing! I found this great leather-like paper so she had to have black leather boots and her hat and dress have "leather" inserts too. The dress and hat is made from S.E.I. linen paper and it is actually very sparkly but it did not show up in the photos (bummer!). I embellished with various rhinestones and rhinestone flourishes and the sentiment is a $1 rubber stamp from Michaels.

This next little witch comes from C.C. Designs (Sweet November Baby Trick or Treat). I bought her from All That Scraps - here. I colored her with copics. The card is Bazzill and the background printed paper is Basic Grey Eerie Collection. The rick rack, ribbon, sentiment and buttons are from my stash. I have lots and lots of odds and ends from Halloween kits and I didn't keep track of what came from where.

The final card is an adorable Christmas elf from A Day For Daisies, "Candy Elf C." It's precious for Christmas *but* if it's a candy elf, wouldn't Halloween be a busy season too? Just a little garment change of purple, orange and black and....viola! a Halloween candy elf! I know, it might be a stretch but he sure is cute all decked out in his trick or treat finery :) I used copics for the elf and the candy is orange Stickles wrapped in cellophane. The sentiment is a rub-on (by TPC). That snazzy striped card is by DCWV!

I have a few more Halloween projects I hope to post soon - I'm going to be off next week (I cannot wait!) and plan to complete my projects and get them posted!

Until next time, Happy Crafting!
<3 Lisa

Friday, October 1, 2010

A Day for Daisies Flower Basket Challenge#3

Happy Friday Everyone! I'm really excited about the next challenge over at A Day For Daisies. The theme is "Lots of Layers!" and I interpreted that as creating dimension with lots of different elements.

This gorgeous mermaid is a digital image from A Day For Daisies. I colored her hair and body with copics. The "bubbles" in her hair are iridescent beads (topped with crystal Stickles). Her fin is painted with Glossy Accents and Pearl Ex powder and then embossed with CB bubbles folder and glittered with aqua Stickles.


So - here are my layers -
1. Bazzill A7 card (base)
2. Cloud 9 Design - "seaside" printed paper
3. Mermaid digi with layered fin
4. Mudd Puddles sand paste
5. Seaweed sprays (Offray iridescent ribbon colored with copics)
6. Bazzill cardstock frame (cut with SB Labels 10 and affixed with pop dots)
7. Craft plastic circle (cut with SB Nestabilities circle)
8. Sentiment sticker
9. Tiny shells
10. Foil strip (sticker)

The challenge is open today through October 14th so please come play along! Also, come check out A Day For Daisies at Crafter's Digital Art Center! It's a great group of crafters and lots of beautiful and inspirational cards!

Have a wonderful weekend!

<3 Lisa